

When it comes to diagnosing electrical issues in your vehicle, a multimeter is an indispensable tool that every car enthusiast and mechanic should master. This versatile device enables users to measure voltage, current, and resistance, offering insights into the health and functionality of various automotive components. Whether you are troubleshooting a dead battery, malfunctioning alternator, or faulty sensors, knowing how to effectively use a multimeter can save you time and money on repairs.
Utilizing a multimeter involves understanding its different settings and functions. By switching between AC and DC voltage measurements, you can accurately assess your car’s electrical system. Additionally, learning to measure resistance can help identify issues such as frayed wires or defective connectors. These skills empower car owners to take a hands-on approach to automotive maintenance, fostering a greater understanding of their vehicle’s systems.
In this article, we will explore the essential techniques for using a multimeter in car troubleshooting. From interpreting readings to applying troubleshooting methods, we aim to equip you with the knowledge needed to effectively diagnose and solve common automotive electrical problems. Understanding the multimeter not only enhances your troubleshooting skills but also boosts your confidence as a vehicle owner.
Choosing the Right Multimeter for Automotive Applications
Selecting the appropriate multimeter for automotive applications is crucial for accurate troubleshooting and diagnostics. Automotive systems often operate in harsh environments, so durability and functionality are key factors to consider.
When choosing a multimeter, consider the following features:
| Feature | Description |
|---|---|
| Display Type | A clear, backlit display is essential for reading measurements in various lighting conditions. |
| Measurement Range | Ensure the multimeter can measure voltage, current, and resistance levels relevant to automotive systems, typically ranging from microvolts to hundreds of volts. |
| Auto-Ranging Function | This feature allows the multimeter to automatically adjust its measurement range, simplifying the troubleshooting process. |
| Durability | Look for a model with a sturdy build, such as rubberized housing, to withstand drops and vibrations commonly found in automotive environments. |
| Safety Ratings | Select a multimeter with appropriate safety ratings (such as CAT ratings) to ensure it can handle automotive applications without risk of damage or personal injury. |
| Probes and Leads | High-quality, insulated probes are essential for safety and accurate measurements. Consider multimeters that come with flexible leads. |
In addition, it’s advisable to look for specialized automotive multimeters that offer features like temperature measurement, RPM calculations, and duty cycle analysis, which are specifically useful in diagnosing car issues.
By considering these features, automotive technicians can choose the right multimeter to effectively troubleshoot and repair vehicle electrical systems.
How to Measure Battery Voltage with a Multimeter
Measuring battery voltage with a multimeter is a straightforward process that can help you diagnose potential electrical issues in your vehicle. Follow these steps to accurately check your battery voltage.
First, ensure your multimeter is set to the correct voltage setting. For measuring car batteries, which typically operate at 12 volts, adjust the multimeter to the DC voltage setting (often indicated as “VDC” or a straight line with three dots beneath it).
Next, prepare your multimeter leads. Connect the black lead to the COM (common) port and the red lead to the VΩmA port. These connections are crucial for obtaining accurate readings. Make sure to handle the leads carefully to avoid any short circuits.
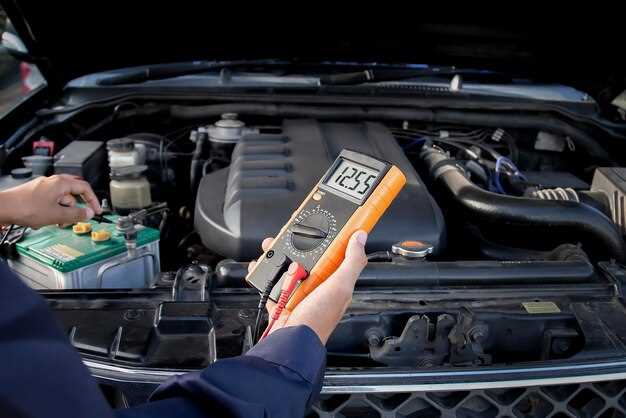
Locate your vehicle’s battery, which is usually found under the hood. Identify the positive and negative terminals, with the positive terminal typically marked by a “+” symbol and the negative terminal by a “-” symbol.
With the multimeter ready, touch the red lead to the positive terminal and the black lead to the negative terminal of the battery. Ensure that you have secure contact for an accurate reading. Take note of the displayed voltage on the multimeter screen.
A fully charged car battery should read between 12.6 to 12.8 volts. If the measurement falls below 12.4 volts, it may indicate a need for charging. Readings under 12 volts often mean the battery is discharged and could signal a potential failure.
After taking the measurement, carefully disconnect the multimeter leads from the battery terminals. Store the multimeter properly to ensure its longevity for future use.
Measuring battery voltage regularly can help you maintain optimal vehicle performance and prevent unexpected breakdowns.
Testing Fuses and Circuit Continuity Using a Multimeter
A multimeter is an essential tool for diagnosing electrical issues in a car, particularly when it comes to testing fuses and ensuring circuit continuity. This process can help identify problems in the electrical system, preventing costly repairs and ensuring the vehicle operates smoothly.
Here are the steps to test fuses using a multimeter:
- Turn off the vehicle and set your multimeter to the continuity setting or the lowest resistance setting (Ohms).
- Remove the fuse you wish to test from its socket.
- Place the multimeter probes on each end of the fuse. Ensure a secure contact.
- If the multimeter beeps or shows a low resistance reading (typically close to 0 Ohms), the fuse is functioning correctly. If there is no beep or a high resistance measurement, the fuse is blown and needs to be replaced.
Testing circuit continuity is equally straightforward with a multimeter:
- Power off the circuit you are testing to avoid any shock or damage.
- Set the multimeter to the continuity setting.
- Connect one probe to the starting point of the circuit (e.g., a power source or switch).
- Connect the other probe to the end point of the circuit (e.g., a light, motor, or ground).
- If the multimeter emits a sound or displays a low resistance, the circuit is complete, indicating continuity. If there is no sound or a high resistance reading, there is a break in the circuit.
Regularly checking fuses and circuit continuity with a multimeter can help maintain your vehicle’s electrical system and prevent unexpected failures on the road.
Diagnostics of Sensors and Actuators with a Multimeter
Diagnosing electrical issues in automotive sensors and actuators is crucial for maintaining vehicle performance. A multimeter allows technicians to measure voltage, current, and resistance, providing invaluable data about the operation of these components.
Sensors, such as oxygen sensors, crankshaft position sensors, and mass airflow sensors, generate electrical signals in response to changes in their environment. To test a sensor, start by locating its connectors and ensuring the engine is off. Set the multimeter to measure resistance (ohms) and connect the probes to the sensor terminals. A reading within the specified range indicates that the sensor is functioning properly; an infinite resistance suggests a failure.
For voltage testing, switch the multimeter to DC voltage mode. With the engine running, probe the sensor signal wire while grounding the negative lead. A signal voltage fluctuating within the expected range confirms the sensor is working as intended. If there is no voltage, it may indicate a wiring issue or a faulty sensor.
Actuators, including fuel injectors, throttle position sensors, and idle air control valves, control various aspects of engine operation. Testing an actuator involves similar steps. First, consult the vehicle’s service manual to ascertain the correct resistance values for the actuator. Measure resistance with the multimeter; values outside the specifications indicate a potential issue.
To test the operation of an actuator, switch the multimeter to measure current draw. Activate the actuator through the vehicle’s diagnostic tool or manually. The current reading should match the manufacturer’s specifications. A higher or lower reading may point to problems in the actuator or associated circuitry.
In summary, using a multimeter for diagnostics of sensors and actuators is essential for resolving electrical issues. Consistent monitoring of resistance, voltage, and current helps pinpoint failures, ultimately leading to effective repairs and improved vehicle performance.
Reading Resistance Values in Electrical Components
Understanding resistance values is crucial when diagnosing electrical issues in vehicles. A multimeter can help you measure resistance across various components, allowing you to identify faults or confirm functionality.
To begin measuring resistance, set your multimeter to the resistance (Ω) mode. Touch the probes together to ensure the meter is functioning correctly; you should see a reading of zero or close to zero. If you get an infinite value, check the connections and replace the battery if needed.
Connect the probes to the component terminals you wish to test. Ensure you are measuring components that have been disconnected from the circuit to avoid interference from other electrical elements. Common components to test include resistors, circuits, sensors, and wiring connections.
When measuring a resistor, the resistance value should closely match its rated resistance–usually indicated by color bands. In the case of other components, you may need to refer to the service manual for specific resistance values, as they can vary widely depending on the component type and its intended use.
Abnormal resistance readings can indicate issues such as open circuits, short circuits, or degraded components. For instance, infinite resistance suggests an open circuit, while a very low resistance reading may indicate a short circuit.
Always remember to handle your multimeter with care and follow safety protocols when working on car electrical systems. By accurately reading resistance values, you can effectively troubleshoot and ensure the proper operation of electrical components in your vehicle.
Interpreting Multimeter Readings to Identify Electrical Issues
A multimeter is an essential tool for diagnosing electrical problems in vehicles. By measuring voltage, current, and resistance, it helps pinpoint issues in various components. To effectively interpret readings, one must understand the expected values and typical behavior of automotive electrical systems.
When measuring voltage, a healthy circuit should show a reading close to the battery voltage, typically around 12.6 volts for a fully charged battery. A significantly lower voltage might indicate a weak battery or poor connections. In contrast, a voltage drop across a component can reveal resistance issues or failing parts.
Current measurements help determine whether components are drawing the correct amount of power. To measure current, you must break the circuit and connect the multimeter in series. Be mindful of the current rating; excessive current draw may suggest a short circuit or a defective component in the system.
Resistance readings provide insight into circuit integrity. Disconnect power before measuring resistance to ensure safety and accuracy. A continuity check with the multimeter will confirm if a wire is intact or if there is a break that could cause a malfunction. A typical resistance value for wires and connections should be low; high resistance readings indicate corrosion or damage.
In summary, effectively interpreting multimeter readings allows for accurate identification of electrical issues in cars. Familiarization with normal values and conditions will enhance troubleshooting skills, making it easier to maintain vehicle performance and reliability.